Getting Started - First Steps
This article will guide you through Paper Shape's basic workflow in order to start tracking your first project activity.
Before starting
Once you have Paper Shape configured, we are going to take a look into all it's parts.
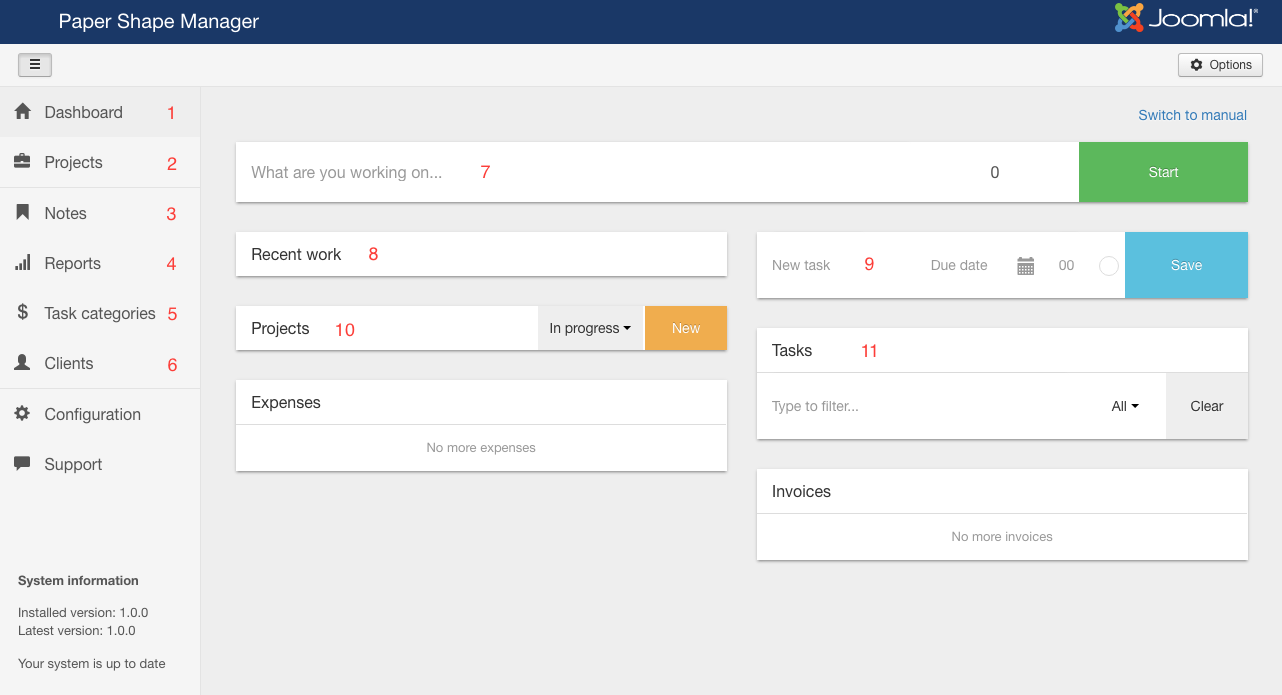
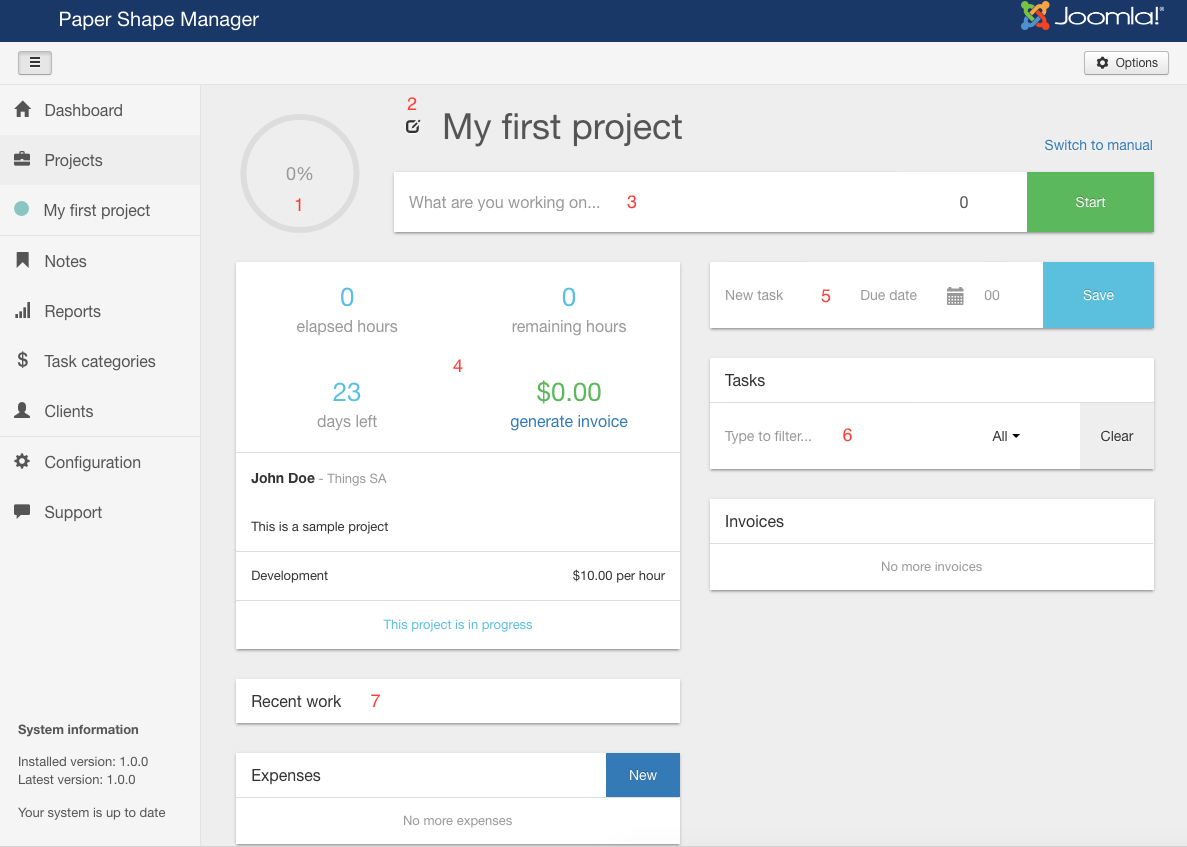
In the image you can see all the sections of the extension. Below are all described.
- Main dashboard. The current screen. There you can manage all your projects and tasks no matter in which project they belong.
- Projects. Once you have a project created, by clicking this menu item, you will see the list of projects to access each one's dashboard.
- Notes section. There you can create notes and reminders of your work.
- Reports. The reports view is used to analyze the work that the team members are doing. You can filter the logs and export them in CSV format.
- Task categories. There you can manage the task types you use to work on and their price.
- Clients. In order to allow your clients to see each project's progress, you need to link their users to a Paper Shape contact in this section.
- Time tracking bar. Once you have a project and a task created, you can start tracking the time you spend working on it with this bar.
- Time log list. When you start tracking your tasks time, this list will show you the tasks in which you recently worked on.
- New task form. There you can create your tasks, assign them an estimated number of hours, a date limit and the project where they belong.
- Project's list and new project button. You will use the new project button in order to create your projects and once they are created you will see them in the list. By clicking them you will see it's own project dashboard with all the tasks and time logs filtered by the project.
- Tasks list. Once you have a task created, it will appear in this list.
Defining task categories
Once you have understood each part of Paper Shape, the first recommended action is to create some task categories from the task categoires section:
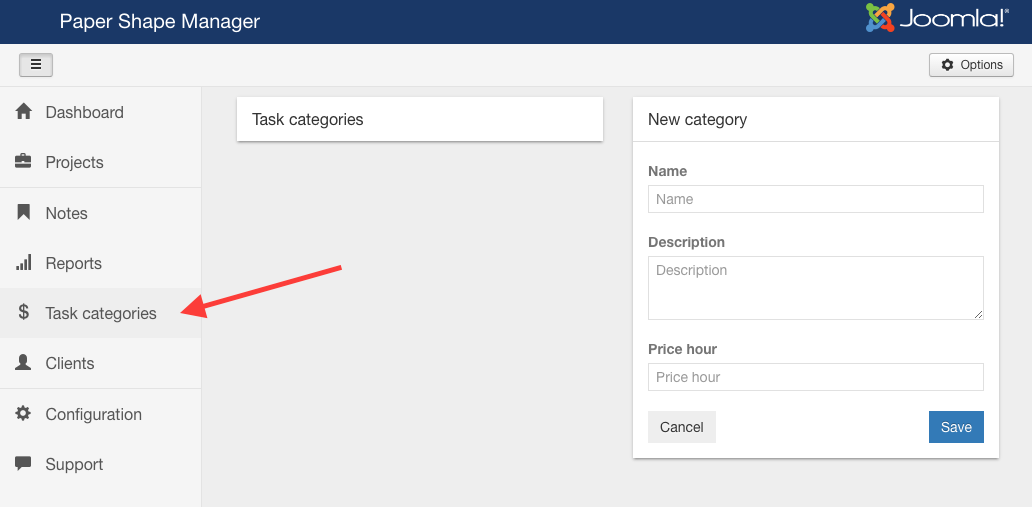
From this view, you can create categories. For example, as developers, we would create a category called custom coding with it's price per hour. Once the fields are filled, by clicking save, the new category will appear in the list from where you can click it to edit it's details and delete it. Note that you can have as many categories as you want ready to apply them to your tasks.
Defining a client for your projects
If you want to allow your clients to see their project's progress, you will need to follow these steps. If not, you can skip this section.
In order to define a client for your projects, we have created a clients section in our component similar to the task categories one:
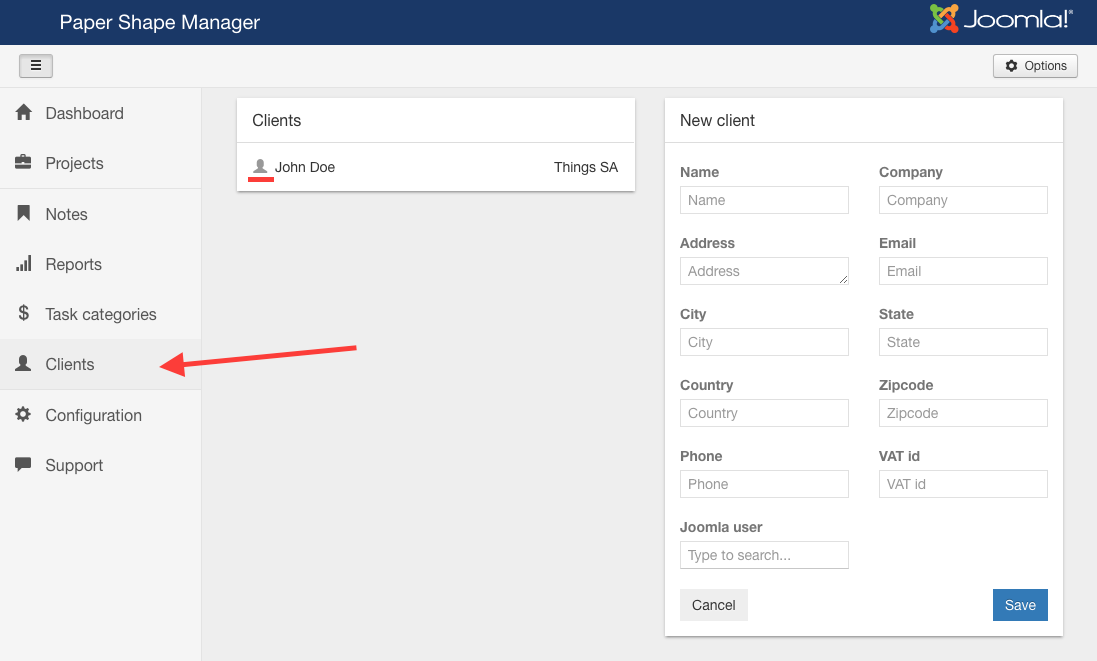
To create a client, you only need to fill the new client form and assign it to an existing joomla user using the Joomla user input field. There, you can start typing your client's name and he/she will appear in the list. By selecting it's name and clicking save, the client will be saved and if it is correctly linked to the joomla user, a user icon will appear next to the contact name in the list.
Important! In order to choose which project information you allow to see to your clients, you must set the ACL configuration in the Permissions tab located inside the Paper Shape configuration. If you don't do it, by default, your clients won't see anything.
Creating your first project
Now that you have some task categories and a client created, it's time to create your first project.
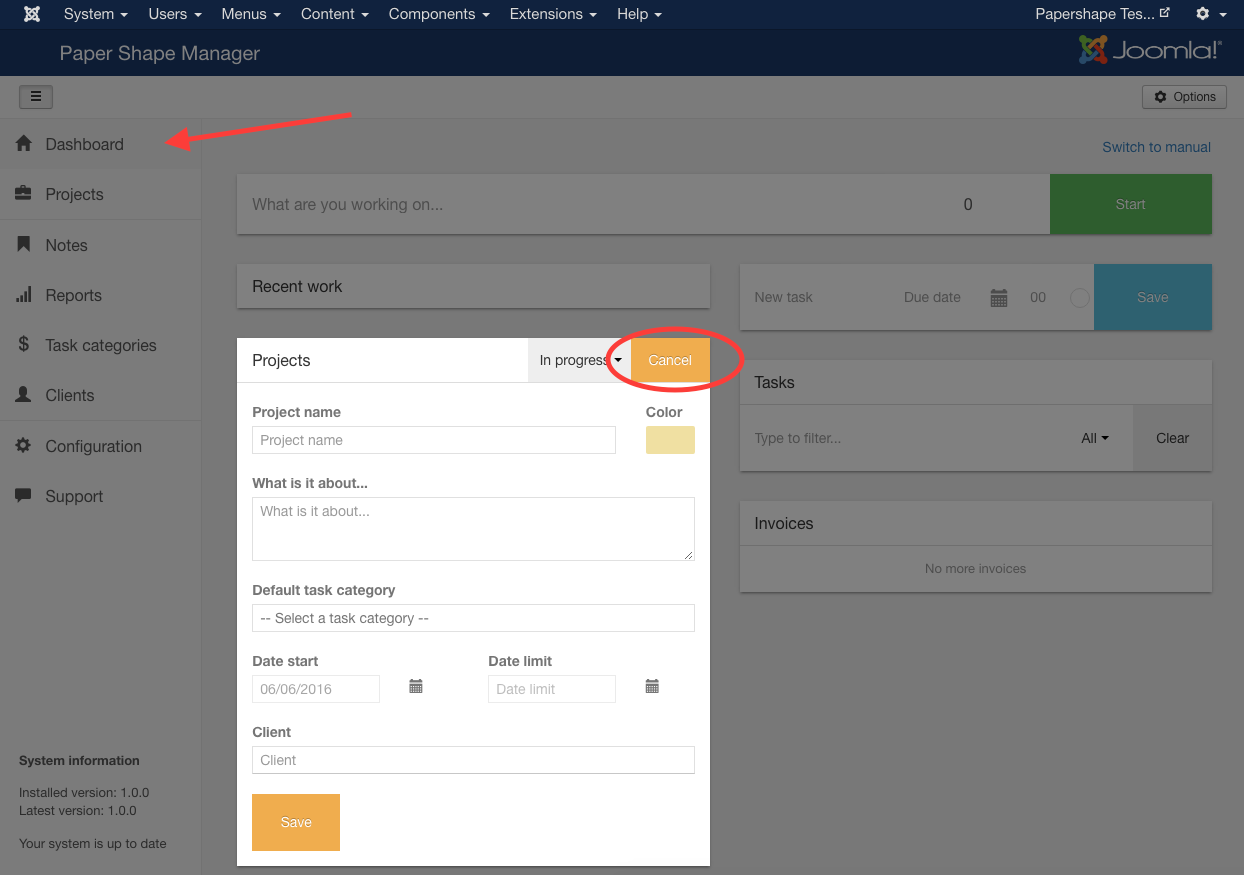
By clicking the new project button located in the main dashboard, you will be able to see a form asking you for the details of the new project such as it's name, a color, a description, the default task category... Note that the default task category is used to set the selected category to the tasks inside the project but it's not relevant now. You can leave it empty if you are not sure about which category will have the tasks inside the project.
Inside the form you will also be able to select a client for the project. To do so, you just need to start typing the client's name inside the client input and select it form the list.
Once you save the project, it will appear on the projects list. Once you see it, by clicking on it, Paper Shape will show you it's own project dashobard. From now on, you will be able to access it by clicking the project on the main dashboard or form the side menu in the projects section.
As you can see, the project dashboard is similar to the main dashboard but everything is related to the current project:
- Project progress. The project's complete percentage that is calculated using the number of completed tasks over the total number of tasks.
- Edit project button. By clicking on it, you will be able to edit the project details and add your teammates.
- Time tracking bar. Once you have some tasks, you will be able to start tracking the elapsed time with it.
- Project information. Some project information about it's progress.
- New task form. With it, you can start creating your first tasks for the project.
- Tasks list. The list of the project tasks.
- Time logs list. Your work will appear on this list.
Project tasks
Now that you are familiarized with the project dashboard, by filling the new task form and clicking the save button, the new task will appear on the task list. As you can see, there is some information related to the task:
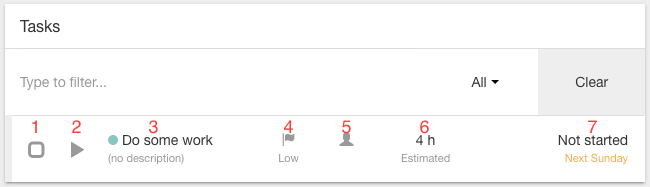
- Completed or uncompleted task icon. Once you have completed the task, you can click this button to let Paper Shape know it.
- Continue task button. It will continue counting the working time of the task.
- Project color, task name and description
- Priority. You can change the priority by clicking on the flag.
- User assigned. Clicking the user icon will allow you to assign a team member to the task.
- Necessary estimated time to complete the task.
- Elapsed time and date limit.
Note that by clicking on the task, you will be able to edit any information relative to it.
Time tracking
At this point, you are ready to start working in your tasks and tracking the time you spend on them. To do so, you have two options. You can switch between them by clicking the Switch to manual and Switch to automatic buttons over the time tracking bar:
Automatic mode

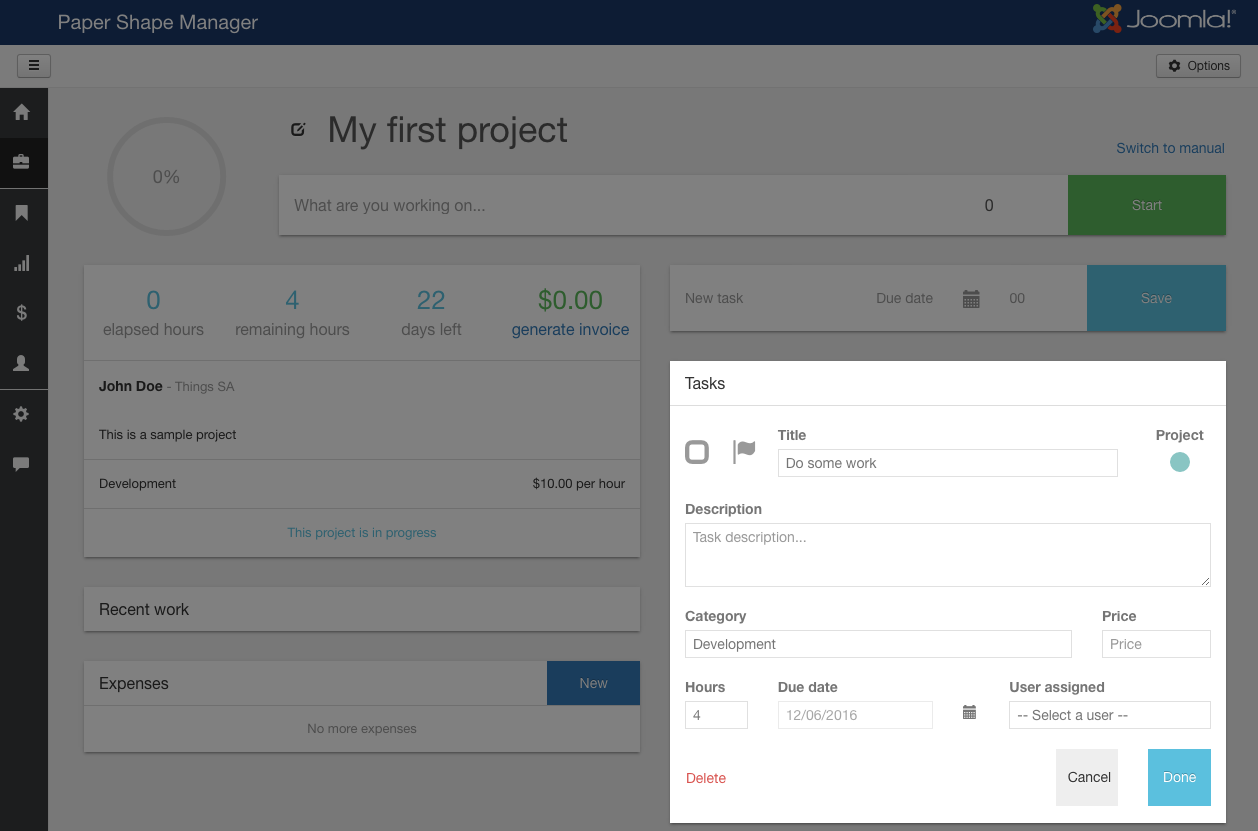
In both cases (the automatic and the manual mode) you have a big input where you can select the task you want to work on by typing it's name. A list of tasks according to the name will appear and once you select the appropiate one, the automatic time bar will start counting time. At this point, you can start working on your task and once you finish or you want to have a break, by clicking the stop button, Paper Shape will stop counting time and store a time log.

Manual mode

The manual mode works a little bit different. In case you first work on your task and after that you want to tell Paper Shape how much time did it take, by selecting your task and entering the day, the starting hour and how much time did it take, Paper Shape will store a time log according to that.
Once you start working, you will see that the list of logs is being filled, there, you can delete and continue the logs. Conitnuing a log or a task it's the same as typing it's name in the time bar and start counting it's time.
Reports
From now on, each time you need to see your teammates dedication or which tasks take more hours or how much money are are you logging, by going to the Paper Shape reports section, you can see all this information, filter it and export it in csv format.
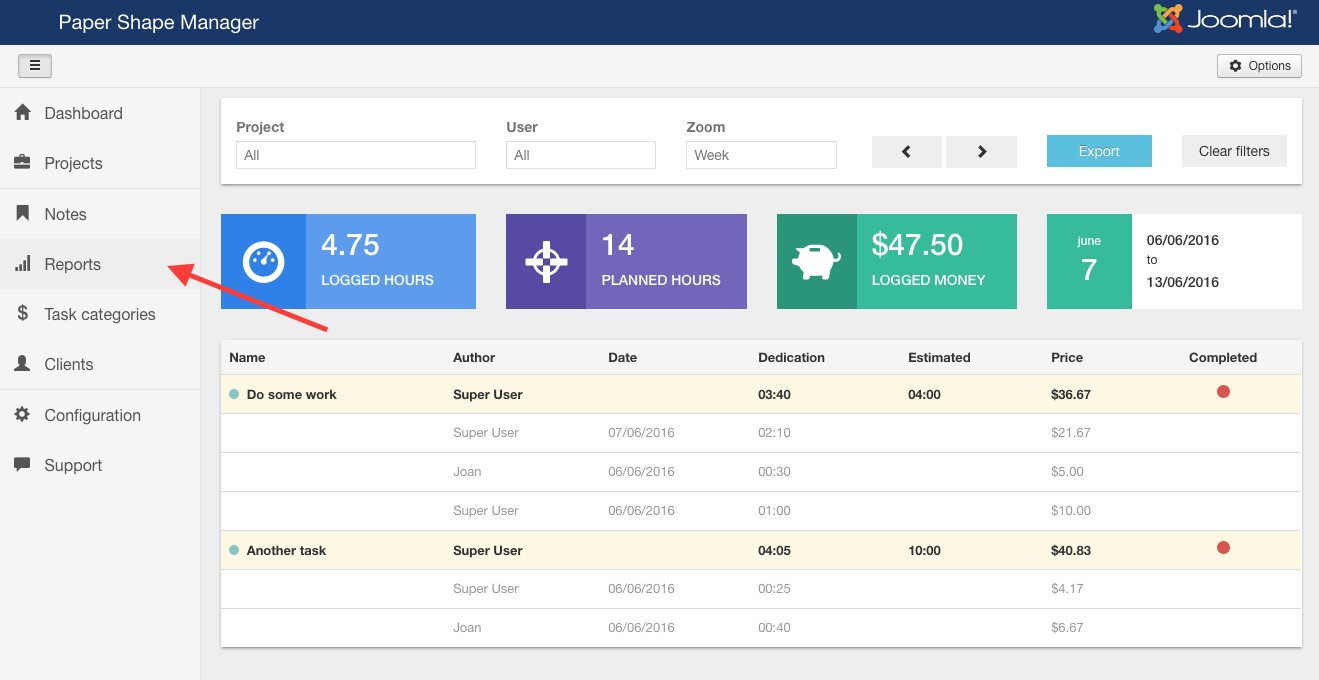
Note: In this view you can see how two different users worked in the same task. To allow a user to work in your porject, you can do it by clicking the edit project button inside each project dashboard. There, you have a field where you can search users by name and add them to the project.
Even more
Now that we have covered all the basic functionalities of Paper Shape, you can discover the notes section, it's integration with Content Statistics, that will allow you to display beautiful and informative charts all over the extension, the integration with Expense Manager, which will allow you to manage each project expenses, and Invoice Manager, which will allow you to create a single click invoice for each project.